Orcaset MCP Installation
Early Access MCP connector
Installation
Add the MCP server at https://mcp.orcaset.com/mcp.
Follow the guides below for detailed installation instructions for Claude and ChatGPT. Team and enterprise accounts may require administrative privileges to add new MCP connectors.
ChatGPT & Codex guide
Claude
1. Navigate to “Settings” and then “Connectors” in the “Customize” section.
2. In the top-right corner, click “+ Add”, then “Add custom connector”.

3. Add “Orcaset” as the name and https://mcp.orcaset.com/mcp as the MCP server URL in the dialog.

4. Accept the default authentication and OAuth client options, then click “Add”.
5. Follow the redirects to create an account, verify your email, and sign in. If you are using the Claude desktop app, you may see a warning about a redirect to an address like “127.0.0.1:49754”. This is an expected redirect back to the desktop app.
6. Close the settings pane and verify the connection by asking for the status of the Orcaset MCP connector in a new chat session.
Once your MCP connector is set up and you’re signed in, follow the quick start guide to add a workspace, build models, and explore deployment.
ChatGPT & Codex
Custom MCP plugins are not available for free accounts or on the web. Certain subscription types may allow custom connectors only in Codex, not ChatGPT. For best performance, connect from the desktop app using a paid Codex subscription.
1. Navigate to “Settings” and then “Plugins” in the “Integrations” section.
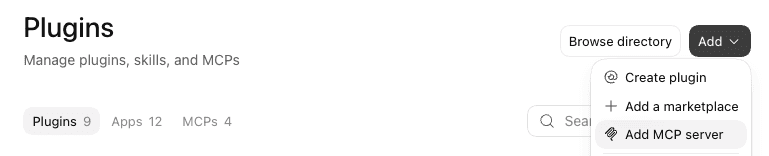
2. In the top-right corner, click “Add”, then “Add MCP server”.
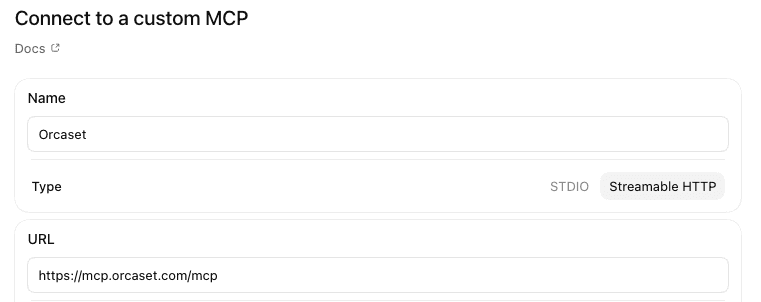
3. Set “Orcaset” as the name, select “Streamable HTTP”, and insert https://mcp.orcaset.com/mcp as the URL. Leave the other fields blank.
4. If you are not automatically prompted to create an account and sign in, navigate to the “MCPs” section in the “Plugins” pane and click “Authenticate”.
5. Follow the redirects to create an account, verify your email, and sign in. During authentication, you may see a warning about a redirect to an address like “127.0.0.1:49754”. This is an expected redirect back to the desktop app.
6. Close the settings pane and verify the connection by asking for the status of the Orcaset MCP connector in a new chat session.
Next steps
Once your MCP connector is set up and you’re signed in, follow the quick start guide to add a workspace, build models, and explore deployment.